There are two important things about smart robot cleaners. The first is battery life and the other is navigation quality. Ecovacs Deeboot includes many different models. The difference between these models is the operating time of the device and the navigation version. The Deebot Ozmo 950 device is a popular, affordable device that will do the job for you. Ozmo 960, 711, T7, Deebot X1 models are also popular devices. If we look at the general features, they are long-term charge movement, quality mat use and navigation features.
- High vacuum power: In addition to providing energy efficiency and low noise, there is a high pressure attraction force.
- Brush system: It can clean up to 10 cm. Both mopping and sweeping functions are available.
- As the device is used, it will recognize your home and work more efficiently accordingly.
- Mapping: With this feature, you can create many mappings and customize the cleaning settings for each separate direction. You can determine where and how much care to take and the cleaning limits in hairtalama.
- It can pass through 20 mm obstacles and is designed and sized to clean small areas.
- It can work in coordination with your Amazon echo devices.
- When its power is low, it automatically returns to the charging station and charges itself. In this way, uninterrupted cleaning is ensured. If you want, you can schedule the cleaning hours.
How to connect Your Deebot to Ecovacs App
First of all, download the application from the android or ios store according to the operating system of your mobile phone. After creating the necessary user information and password, we will connect the device to the application.
Keep your Deebot zmo close to the router and your mobile phone. Set the wifi settings on the router to 2.4 GHz. And connect to this wifi network from your mobile. If you want to use 5Ghz for your home internet after the first installation, it’s okay to use it. After the first connection for Robor, it will recognize its own wifi network and connect to it.
As the next step, open the application you downloaded and add your device from the “add robot” section. Then follow the instructions given to you and it will take 1 minute. After installation, you can easily manage your device from anywhere.
Making Your First Map with Ecovacs Deebot
With the OZMO 920/950/T5 it’s easy to make a map of your home. The robot creates a clean map with the laser it uses when starting to clean. You can set the areas or borders that you do not want to be cleaned on the map via the phone application.
1) First you must determine the location of the main charging station. This is very important, you cannot relocate it later for the same map. If you change its location, it will create the map again from the beginning and you will have to make adjustments.
2) Open all room doors and remove any obstacles that will prevent Deebot Ozmo 920/950/T5 from finding all rooms, hallways, kitchen and other areas.
3) Open your application on your mobile phone and turn on your green continuous cleaning mode on the Robot.

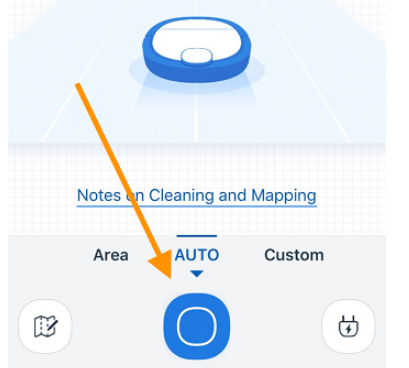
4) Open the advanced mode by going to the application settings. In this advanced mode, the continuous cleaning feature will be turned on. Then send your Robot to its first job by pressing the AUTO button in the app. It will do both cleaning and mapping. After that all you have to do is nothing. Just wait and let Ecovacs Ozmo work.
5) Leave the next job to the Robot. Leaving that charging station, it will both vacuum and map your house for more than 1 hour. When the charge decreases, it will charge back and continue from where it left off. Don’t touch anything and wait. If you interfere with Ecovacs, you will stop mapping and have to start over next time. When it’s done, you check the map and save it. Yes, for the last time, do not interfere with the charging station or the Debot Ozmo device at all when you start the device for the first time.
To reset: Press and hold the “reset” button for 6 seconds to reset your device. A sound will be heard when the reset is done.